Monday, February 27, 2017

Fabric in Singapore

Our next foray was to Singapore. Singapore has about 5.3 million people despite the fact that it's less than 300 square miles (or 72,000 hectacres, for my overseas readers).


We were lucky enough that the train system was amazing and we took it everywhere...and I saw Singaporeans love to sew, too! This lady was sewing by hand on a moving train! 


When the urge to sew strikes, you seize it, even if it's hand-appliqueing on a fast-moving train!


Once we'd seen some other sights, we visited a couple textile markets; Mustafa Centre and the People's Park Market. 


Let's talk about the People's Park Market - I've found when people say "Chinatown" in Singapore that they probably mean the People's Park Market. I realized this the hard way. We literally walked the streets of Chinatown in Singapore looking for it. 


Now, this was not without benefits, as we saw the Buddha's Tooth Relic Temple and Museum and walked the streets lined with markets, stalls, and food galore.


But unfortunately the lovely store I heard has Liberty of London fabrics that I've been dying to see in person was closed, as it was a Sunday. 


This was my first view of the textile floor - using the word fabric gets you sent to the clothing section.


Again, since it was Sunday a lot appeared to be closed, but there was still plenty open!


You have to be a bit careful here, because if you live somewhere that already has a great fabric selection, Singapore is kind of pricey already. 


So if you pick up a pretty bolt of Cotton & Steel you may find yourself looking at the equivalent of $20 USD/metre.  No thanks!


However, stumble into the right store (like the one pictured just below) and you'll find not only a cute little quilt shop, but one with great prices too! 


This one didn't have a name that I could see posted, but it's in the very back corner right before you get to the restrooms (take your own toilet paper!) and the stairs. If you enter from the long side of the building it's back left.


It's also very obvious from outside as well because you can see white shelving and they have fabrics on the outside but there's something...quilt-store-esqe about this cute little booth that I rarely see in this part of the world. 


No material on the floor, everything beautifully organized, and kind, smiling staff. 


I picked up 5 yards of peach with little white plus signs (this one vendor was yards, the rest are metres) for only $30USD! 
That made me happy enough to run to an ATM for more Singaporean dollars. 


This next store was just down the way on the same side and had a lovely lady who greeted me more cheerfully than most of the shops in the market.


She was kind enough to permit me to take a few photos, and when I mentioned I quilt she immediately said "so this market is like candy to you!"


Her store was also beautifully organized, and I just had to have a few prints from here too!


My other fabric stop was at Mustafa Centre, which you have to see to believe. It's five stories tall, located in Singapore's Little India, and a combination of Walmart and Costco on steroids!


It crosses a road and takes up several city blocks. Everything in that store has a massive wing and things are available at all price points.


Here's a first shot of the fabric section...!!! Unlike the People's Park Market, this place is very slightly less expensive for fabric, depending on what you're looking for.


Here's another small shot of the fabric section - it was at least 4-5 times the size of this photo. 


And some pretty shots of the bolts...


Here was my haul for the day...


I've already got plans to use those awesome grey dots in a quilt pattern I'm designing!


Here are some other highlights of the trip...the Singapore Art Science Museum had an M.C. Escher exhibit. I always love to see other artists' works in any mediums, and it was a true honor to see the work of such a famous one in person.


Above is his famous "Drawing Hands," 1948, Lithograph. It's hard to tell in the photos, but this is a very three dimensional drawing. The hands appear to come off the page!


And here is his "Relativity," 1943, also via Lithograph. 


Below are a few photos of quilts I forgot to show you in my posts on Kuala Lumpur.


My husband and I enjoy experiencing other cultures, to include learning about different religions, and when we visited the Islamic Arts Museum these hung in the gift shop... 


All of these pretty pieces were sewn by hand and reflect designs traditional to many places around the world that practice the Islam religion.


My favorite part was all the detail and looking closely at the needle-turned applique pillow. It reminds me that the sewing world is able to transcend any boundaries.

Monday, February 20, 2017

Making Batiks

My last foray in Kuala Lumpur, Malaysia for this trip was a great tour found by my husband and it included a trip to a store where they make batiks to learn about the process!


Some batiks painted on paper displayed in the shop


I had lessons on batik in high school, but it was on paper instead of fabric and I was curious to see if it was the same process.


I was greeted by sights of these lovely batiks immediately. Imagine my surprise when they didn't look anything like the ones you purchase in the stores most places!


Hand painted batiks...and the wax is still inconspicuously on both!


The Malays, as it turns out, took batiks and made them their own. You won't see anything that resembles the types of batik you are used to here unless it's been imported.


The Indonesians typically create prints by hand dyeing, machine work, or the low quality batiks are only printed on one side. The guide advised if we see a batik material that is not the same on both sides it is very low quality. 


The Indonesians also usually use what the Malays call a "block print," which means it has what we in the quilting world call a repeat.


Block print (Indonesian) vs. Sketching the print, which is typically more Malay


They call laying the wax Canting, and painting of the batik Coloring


Here are some photos detailing how the process usually works:


Typically you'd start by dyeing your fabric to begin with - that color is the color that will show through once you remove the wax. So if I wanted my designs on the material to show in yellow, I would dye it yellow first. 


Once it dries, it's time to sketch and then lay down your design in wax. The wax is layered on thick enough to sit on top of the material for later removal.


Then, as pictured below, you'd dye it in the color you want to show most. So if you look at the first photo in the post, that's a mint green. 


Then you leave it to dry, and would likely use color setting methods after this.


But that's how most places do it. In Malaysia, the Malays do it ALL by hand. And they start with a blank piece of silk.


The Malays create silk batiks and their process begins by drawing the wax on by hand. 


Their wax is put on more thinly and it's designed to mesh in with the material, creating a barrier all the way through the fabric instead of sitting on top to be removed later. 


Unlike your typical store-bought batiks though, they also don't waterproof these. They recommend having them laminated or sealed in some way and then framing them.


These are usually created as strictly art pieces.


Our guide here is demonstrating how he creates batiks. 


This particular artist is so confident he never sketches by hand first but instead goes straight in with the wax...how brave!


He was then generous enough to trust me with a batik he later intends to sell!


I held my breath and tried not to screw up his art!


Unlike the Indonesians, they don't seem to have a color/technique specialty by province, and it's all interpretation based on the artist.


 Look how pretty it is!  This painter tends to use more earthy tones in his work, but Malays have a wide variety of interpretations and color sets. 


I'm honored to know "my" work will be sold when he's finished 😄 Mine is the super awesome brown one in the center. Can you tell I'm born to batik? 😂


These are some of the tools they use in the laying of the wax.


These beauties are examples of the hand-painted batiks! I fell in love with the yellow and teal beauty in the center and had to have it! 


Really, I'd have bought them all, but just like quilts are art, these are too...which means they had the price tag to match!


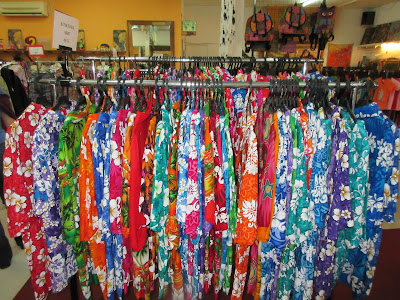
"Hawaiian" shirts. These are made with the low quality batik the guide mentioned. They are perfectly suitable for clothing, but not quilting!


 Here are a few more lovely examples of art I saw around the shop, all created by different local artists...


And last but not least, what I took home...


This one was by my guide...I like to think those red spots are someone else's original work as well 😉


My best purchase on the whole trip! This was just after I unrolled it.


Well, that just about covers the fabric highlights of my trip to Kuala Lumpur.


It was really an honor to meet some artists, and even more of an honor when they thought my quilts were art too! 


I think it's safe to say I won't be cutting these up as quilts, but I will be finding a way to waterproof them, as I don't really want to frame them. I like them hanging brilliant and free the way they were when I spotted them.


Did you know how they make batiks? Are you ready to jump on a plane after seeing their gorgeous hand-painting?


Thursday, February 9, 2017

Malay batiks


I love visiting fabric stores wherever I go, and my most recent trip started in Kuala Lumpur, Malaysia.


Admittedly, I didn't do as much research as I should have on where to go to buy fabric because sometimes I forget quilt stores aren't as easy as Google like they are in the US.


I visited the Central Market in KL, which is full of vendors from all over. 


It's a massive market that I actually find more interesting than Istanbul's Grand Bazaar because people of all nationalities get together and sell their goods.


Admittedly, it's expensive compared to individual stores in KL, but still cheap for western travelers the experience alone was worth it.


There are rows of Indian, Chinese, Japanese, Malaysian, and even Western goods that leave you certain to find something for everyone! I could have spent all my money and my time there, but seeing as we had 2 other countries (that also had fabric!) to see, I took a more conservative route.


The clothing here is why I thought I wasn't going to find fabric...


I initially walked past this store, as everyone seemed to think "batik" meant clothes already made. I assumed those lovely fabrics hanging were sarongs, but when I visited the shop next door it turned out the lady owned both. 


When I mentioned I was looking for fabric because I'm a quilter, she got very excited and took me next door to Noor Arfa.  I realized then that this store has very little clothing and a lot of fabric!


And then I saw this row right behind that clothing!


All the beautiful batiks!


Admittedly, I only bought a bag of assorted batiks around mini-charm or charm square size because these batiks came from Indonesia, a later stop. But I still loved chatting with her and talking about how they make their quilts there.


 After our conversation and my purchase she showed me the above and below curtains they made - much more detailed than I would get with curtains - that they made from scraps from batik clothing. 


The clothing on the right above is an example of traditional Malaysian clothing and surprisingly enough, wearing batiks is a status symbol there! The more fine, elaborate batiks you wear the higher your status in Malay culture. 


But personally, I'm still looking at those beautiful curtains!


Next post will cover my trip to a batik boutique where they paint and sell boutiques! I'll cover the process they use to make batiks and show you the lovely batiks I just had to bring home.


Thursday, February 2, 2017

Infinity Scarf Tutorial

Due to popular request, I've decided to give writing tutorials a shot.


Since this post is a bit longer than I anticipated, I've got the one about the fabric store in Malaysia ready for you next week.


I made some adorable infinity scarves from my most recent trip through Malaysia, Singapore, and Indonesia, where I just couldn't stand how beautiful all the batiks were!


Here are the originals (don't mind the lack of closed seams there)


And then here's what your finished product will look like...I used some Tula Pink for this one.


Now, there's two ways of doing this: the very exact, precise version, and then mine - the go-with-it version. I'll do my best to give you the precise version, but let you know where you can cut corners and not get too exact.


First, you need around 1.5 yards, 59 inches, or something of the sort whether longer or shorter. The scarf you see me wearing is 59 inches, and despite looking snug I feel like I had a ton of room to arrange and maneuver to suit me. I'm on the smaller side at 5'3", but I still think it's nice and large. 


I used cotton, though that's definitely negotiable as well.


This is totally a "go with it" in terms of the length. You should have around a piece around 20-22 inches wide and around 56-60ish long. My measurements were 21x59 and no one will notice a few inches either direction.


Here's what that looks like, approximately.


Now go give your fabric a press before we get started. While this is very forgiving and imprecise, there are a couple things I like to do here.


I like to even my material out while pressing. Sometimes it doesn't always come off the bolt lined up and if I want 2 scarves I like to even it out (or sometimes I want to hoard every inch I can...).


You can do that by lining up the bottom of your selvages and smoothing all the material towards the crease on the bolt. Not a requirement, I just like things even and sometimes it even comes off the bolt wrapped unevenly. 


If you want to use the imprecise method, you won't want to skip this step though.


Line up your selvage edges


Once you have that lined up, you can see I have about 1/4 of an inch to press flat. A bit of Best Press and work your way down the seam.


And then press that crease out!


Now, for the precise people, feel free to take whatever measurement you decided you wanted to use and measure it out. You imprecise people follow me...


We're taking our scissors down that line we just pressed!


Again, no need to be super precise here, you want to get close but an 1/8th of an inch here or there isn't going to hurt.


You can also square up your ends here but I like to leave those for later. 


We do need to cut off our selvages though, and I like to do that by lining up my selvage edges, folding, and gently smoothing (not too much!) until I'm ready to cut. Overworking it here will cause you to have "elbows" at your folds. 


Now we have a nice long tube to sew together, so put your right sides together, pin if you wish, and sew yourself a tube.


I didn't pin, these are so forgiving I like to adjust as I go. Since the scarf twists and bunches, no one will notice a pucker or a slightly crooked seam.


I even used my 1/4 inch patchwork foot - I don't see a need to worry about double or thicker seams since scarves typically aren't put through the stress of normal clothing.


Now it's time to take your tube, turn it inside out, and press it. I like to reach my arm all the way through, grab the ends, and pull it all through in one motion.


Now I really like to use Best Press so my seams are nice and crisp and make sure to roll the fabric in my fingers as I go along so I don't press the seam too far in.


After I've pressed it is also when I like to deal with those pesky edges. As Angela Walters likes to say, "close enough is good enough!" and I think that applies here too. 


Just align your ruler so it's square with the top and bottom, move it in as much as you need to, then give it a quick swipe with your rotary cutter.


Now I have these python-looking ends that admittedly look like they might bite or at least complicate my life.


So what to do with these ends? Never fear, it's easy too!


I like to start with my seam for pinning, since it's literally the only thing to line up here.


And if you mis-align the seam? Meh, who's going to notice? 


If you insist on aligning the seam, however, continue with aligning and pinning. I like to start by pinning the seam, then aligning about 1-2 inches before it with another pin and a few more after that.


Pinning the entire thing at once isn't going to work, so I start with 4-5 pins and put it under the machine. 


Forgive my slightly blurry photo here, I think we all know what material under a machine looks like and can ignore that I'm still learning my camera...


Once you've sewn several inches and removed your original pins, it's time to turn this thing inside out.


Wait! Don't take it out from under your needle!


I don't like to stop a stitch where I can, so I just reached in again - as far as I could for convenience - and pulled it inside out.


This doesn't have to be pretty. It probably won't be. Don't worry too much about it as long as you have all the material you need within your seam.


Then continue sewing until there's an opening of about 3-4 inches left (or if you're like me, about 2 since I like to live dangerously)


Be sure to keep all your fabric away from the needle except for your 2 seam pieces, and when you get there use a securing stitch or stitch 3-4 times in place to make the next step easier.


Here's my tiny opening as I turn it back right-side-out. I like to try to finesse it slowly so it eases out. 


Once it's been turned right sides out again, we have a small hole to deal with.


You can either stitch it closed by hand, or, if you're feeling imprecise today too, you can join me in machine stitching it closed.


Give it a couple pins if you like to hold everything in place...


Run that couple inches under the machine...


And there you have it!  A beautiful infinity scarf for yourself or a loved one!


I hope you enjoyed my first tutorial, please leave me comments and feedback on if you found it helpful and ideas for what you would like to see in the future!